PIN PUNK
Learn how to make your own laminated pins & badges.

The short do-it-yourself version.
| ||||||||
The longer step-by-step version. Step 1 - Choose and prepare your image (message or text)
We're assuming you are capable of doing this without our help. If you can't think of a single image or idea for making a button, then go here.
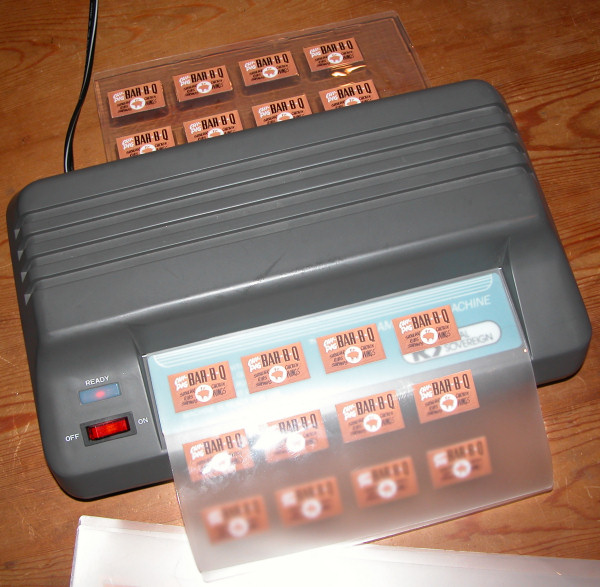
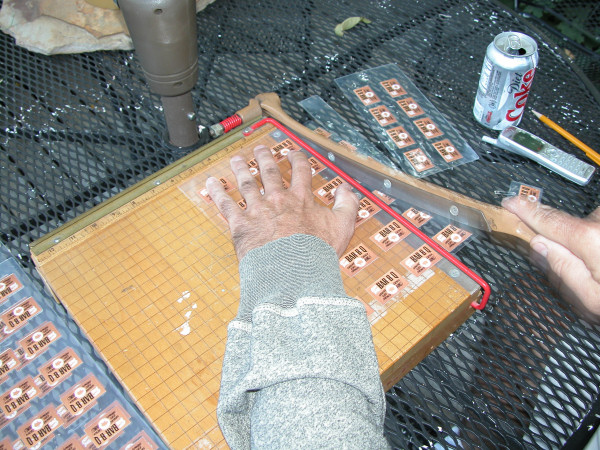
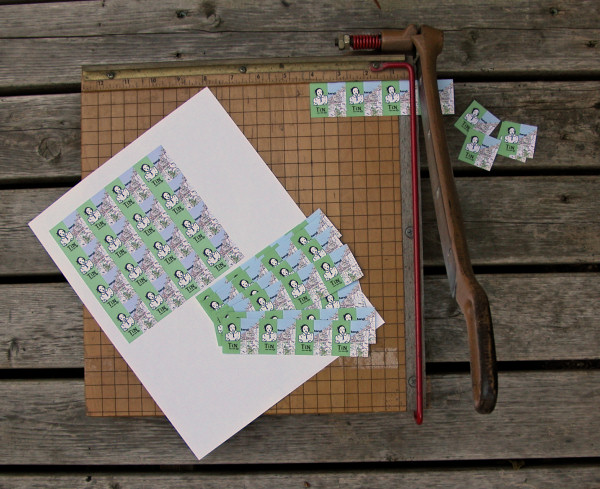 Here I am using my old "guillotine" cutting board to cut a master sheet of 16 (4 x 4) pin images. I trim the sheets, then cut them into rows, and then cut the rows into individual pieces of paper. You don't have to use a cutting board (and if you do, you'll probably want to use a more modern and less dangerous one than this). Of course, you can also just use scissors to cut out the pieces of paper. If you like straight edges, however, your going to want to use a cutting board or a ruler and razor knife. Using a cutting board seems to be the quickest and most efficient way to cut up a lot of pieces of paper. Cutting the paper pins up as precisely as you'd like may take some practice, however, so always be prepared to screw up and waste some of your paper pins during this part of the process. Step 2 - Laminate your image - instructions for hot (thermal) laminating Buy your own double sheets (also called "pouches") of thermal laminating plastic from an office supply store (like Staples) or a copy center (like Kinko's--now FedExKinko's). These sheets/pouches come in various thicknesses. I like to use 5 mil or 10 mil thick laminating plastic -- otherwise the little pins and badges are not strong or durable enough for my tastes. Your own preferences about this may vary, so try out various thicknesses before committing yourself to buying a box of pouches.
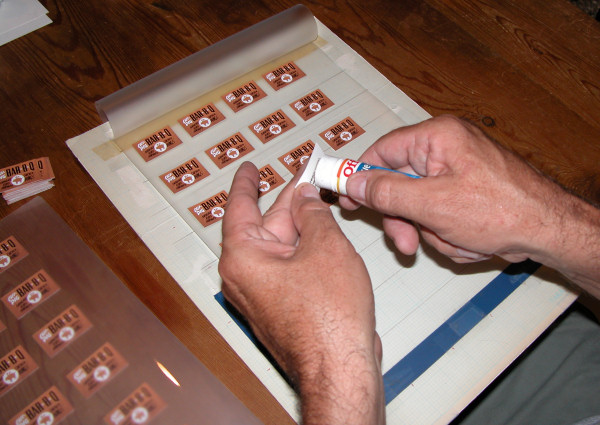 Here I am laying out a 9x11-inch laminating pouch with individual pieces of the pin image. I use just a touch of the glue stick to give the back of the pin image just enough stickiness to stick to the laminating plastic. I created this cardboard graph-paper board to help me layout my pin images in precisely straight rows and columns--leaving just enough space between and above each pin for the clear laminating plastic that will frame each pin. Laying the images out in straight rows and columns make the job of cutting up the laminating plastic into individual pins much easier than if each pin has to be cut out by hand. If you don't have easy access to a laminating machine to melt and press your laminating sheets, then you will need to find a local outlet (such as Kinko's) who will do this for you (for a fee or the laminating may be included in the price of the laminating pouch). If you find yourself making a lot of these laminated pins and badges, you may want to get your own laminating machine. They come in various shapes, sizes, and prices. Don't rush into this. Do your homework before buying. Step 3 - Cut out your laminated image
Step 4 - Punch hole(s) in the laminated image
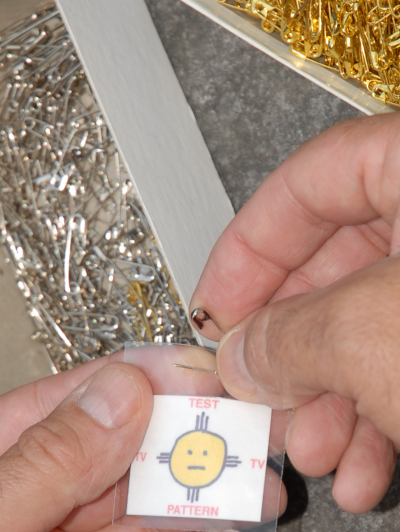
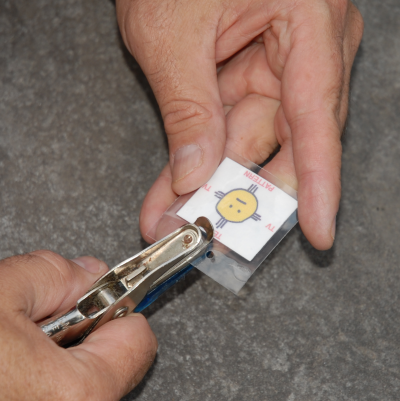 I use a small handheld mechanical paper punch to put holes in the laminating plastic. If I use one hole, the laminated badge will "dangle" from the safety pin. If I use two holes, and put the safety pin through both holes, then the pin is snuggly fastened to the clothes. Paper punches come in different sizes and make holes from 1/8-inch, to 3/16-inch to 1/4-inch. The 1/4-inch punch is the most common and easy to find, but I like to use a 3/16-inch punch for badges because the hole is smaller and doesn't require as much clear plastic above the image (i.e., gives me more choice and room). I like to use the smallest size hole punch--1/8-inch--to make the two holes for a pin. These smaller holes hold the safety pin more tightly insuring the pin won't slip sideways. The 1/8-inch hole punch, however, is the hardest size to find in retail stores. Hand hole punchers - three different hole sizes. When making badges, I use the paper punch to put one medium-sized round hole in the center at the top of the badge (in the the clear plastic above the image). I sometimes punch the hole off-center so the badge will hang at an angle.  When making pins, I use the paper punch to put two small-sized round holes in the clear plastic at the top of the pin. The holes should not be too close, but also not further apart then about three-quarters the length of the safety-pin you are using. You can put the safety pin on the front of the pin and pin it to the cloth or you can push the safety-pin around and through the holes (revolve it from front to back through the holes) so it is on the back of the plastic rectangle. This style holds the pin out from the cloth and some people like this style better--some find it easier to use and affix to their clothes and the safety pin stays with the laminating plastic at all times). My own preference is the regular pin type with the safety pin on the front. It's simpler and easier to assemble. Your preferences may differ and may vary depending on the pin, the audience, and the project. All three fastening methods are illustrated in the picture below. 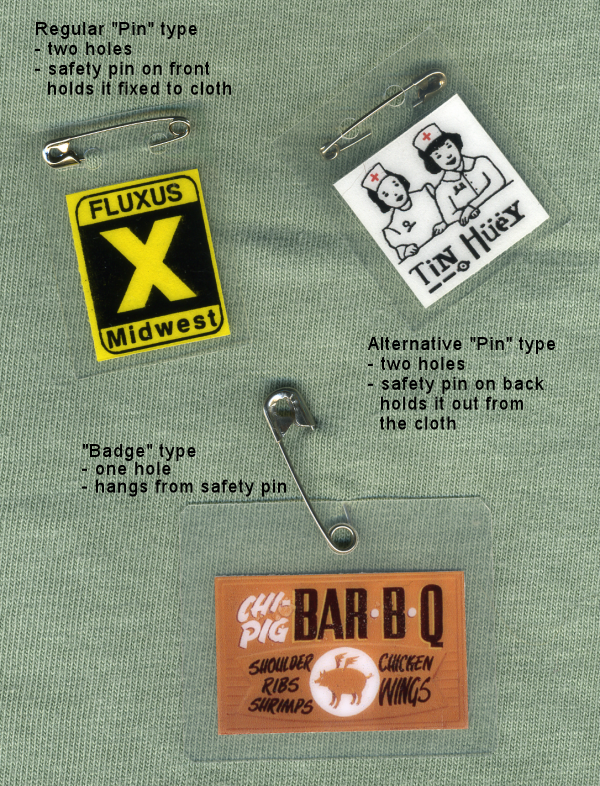 Step 5 - Add a safety pin
Step 6 - Wear it and hand them out!Although the creative process is (or should be) its own reward and pleasure, wearing these pins and badges out and seeing (or imagining) the reactions of others is also fun. Most people on the planet have never or rarely seen a laminated pin or badge before, so they are often impressed by the simplicity and novelty of it. Make a bunch of pins and hand them out to family, friends, and strangers! | ||||||||
 |  |  |

- Kebutuhan akan air bersih di daerah pedesaan dan pinggiran kota untuk air minum, memasak , mencuci dan sebagiannya harus diperhatikan. Cara penjernihan air perlu diketahui karena semakin banyak sumber air yang tercemar limbah rumah tangga maupun limbah industri.
Cara penjernihan air baik secara alami maupun kimiawi akan diuraikan dalam bab ini. Cara-cara yang disajikan dapat digunakan di desa karena bahan dan alatnya mudah didapat. Bahan-bahannya anatara lain batu, pasir, kerikil, arang tempurung kelapa, arang sekam padi, tanah liat, ijuk, kaporit, kapur, tawas, biji kelor dan lain-lain.
- URAIAN SINGKAT
Penjernihan air minum secara sederhana ini merupakan penjernihan air dengan cara penyaringan. Bahan penyaringan yang digunakan adalah pasir dan tempurung kelapa.
- BAHAN DAN PERALATAN
- 2 (dua) drum ijuk
- pipa PVC dengan diameter ¾ inci
- kran air
- pasir
- kerikil
- potongan bata – cat
- gergaji
- parang
- besi
- bor
- kuas
- ember
- cangkul
- 2 (dua) drum ijuk
- PEMBUATAN
- Membuat pipa penyaringan lihat Gambar 1. :
- Ambil 2 pipa PVC diameter 0,75 inci dengan panjang 35 cm.
- Pipa PVC dilubangi teratur sepanjang 20 cm.
- Bagian dari pipa yang dilubangi dibalut dengan ijuk kemudian ijuk diikat dengan tali plastik
- Salah satu ujung pipa dibuat ulir.
- Gambar 1. Pipa Penyaring
- Ambil 2 pipa PVC diameter 0,75 inci dengan panjang 35 cm.
- Pemasangan pipa penyaring (lihat Gambar 2.).
Pipa penyaring dipasang pada drum pengendapan dan penyaringan dengan jarak 10 cm dari dasar drum.
- Membuat drum pengendapan (lihat Gambar 2 dan 3)
- Buat lubang dengan bor besi 10 cm dari dasar pada dinding drum untuk pipa penyaring.
- Pasang pipa penyaring yang sudah dibalut pada soket yang sudah tersedia (lihat keterangan No. 2)
- Pasang kran
- Buat lubang pada dasar drum dengan tutup.

Gambar 2. Pemasangan Pipa Penyaring
- Buat lubang dengan bor besi 10 cm dari dasar pada dinding drum untuk pipa penyaring.
- Membuat drum penyaring (lihat Gambar 2 dan 3)
- Buat lubang untuk pemasangan pipa penyaring dengan jarak 10 cm dari dasar drum.
- Isi drum berturut-turut dengan krikil setebal 20 cm, ijuk 5 cm, arang 10 cm, ijuk 10 cm dan potongan bata 10 cm.
- Buat lubang untuk pemasangan pipa penyaring dengan jarak 10 cm dari dasar drum.
- Penyusunan drum endapan dan penyaringan (lihat Gambar 3)
- Drum pengendapan dan penyaringan disusun bertingkat.
- Kran-kran ditutup dan air diisikan ke dalam drum pengendapan
- Setelah 30 menit air dari drum pengendapan dialirkan ke dalam drum penyaringan.
- Aliran air yang keluar dari drum penyaringan disesuaikan dengan masukan dari drum pengendapan.

Gambar 3. Cara Kerja Penyaring Air
- Drum pengendapan dan penyaringan disusun bertingkat.
- Membuat pipa penyaringan lihat Gambar 1. :
- KEUNTUNGAN
- Air hasil penyaringan cukup bersih untuk keperluan rumah tangga.
- Membuatnya cukup mudah dan sederhana pemeliharaannya.
- Bahan-bahan yang digunakan mudah didapatkan di daerah pedesaan.
- Air hasil penyaringan cukup bersih untuk keperluan rumah tangga.
- KERUGIAN
- Pemeliharaan memerlukan ketelitian dan cukup memakan waktu seperti :
- Drum pengendapan dan drum penyaring harus dibersihkan, jika aliran air yang keluar kurang lancar. Ijuk, kerikil, potongan bata, pasir dicuci bersih, kemudian dijemur sampai kering.
- Arang tempurung biasanya paling lama 3 bulan sekali harus diganti dengan yang baru.
- Tidak bisa digunakan untuk menyaring air yang mengandung bahan-bahan kimia seperti air buangan dari pabrik, karena cara ini hanya untuk menyaring air keruh, tapi bukan menyaring air yang mengandung zat kimia tertentu.
- Drum pengendapan dan drum penyaring harus dibersihkan, jika aliran air yang keluar kurang lancar. Ijuk, kerikil, potongan bata, pasir dicuci bersih, kemudian dijemur sampai kering.
- Untuk keperluan air minum harus dimasak terlebih dahulu sampai mendidih.
- Pemeliharaan memerlukan ketelitian dan cukup memakan waktu seperti :
Membuat AC Sederhana Murah Meriah dan Hemat Energi
Cuaca Jakarta belakangan ini memang terasa panas sekali. Ungkapan bahwa neraka sedang bocor kayaknya terasa benar adanya. Air Conditioner (AC) saat ini seakan menjadi kebutuhan wajib saja. Padahal sejak semula, kami tak pernah kepikiran untuk memasang AC dengan pertimbangan tidak sehat, juga tidak ekonomis.
Setelah mencari berbagai alternatif solusi untuk mendinginkan suhu rumah - tidak termasuk menggantung ayam ya :D -, akhirnya saya temukan sebuah solusi yang cukup kreatif, yaitu membuat AC sederhana.
Dengan tambahan dana sekitar seratus ribu, maka kipas angin rumah sudah bisa kita fungsikan sebagai AC. Berikut ini adalah bahan-bahan yang dibutuhkan:
- Kipas angin rumah (stand/duduk) ukuran agak besar/seadanya.
- Pipa tembaga ukuran 3/16" panjang terserah. (Beli di toko AC/perlengkapan AC, tukang service AC) 8 rb - 13 rb/meter
- Cable ties secukupnya, beli di minimarket juga ada.
- Pompa akuarium kecil (beli di toko akuarium) 45-65 rb/pcs
- Pipa plastik 3/16" beli di toko bangunan.
- Tandon air atau termos es.
- Siapkan pipa tembaga dan kipas angin. Buatlah lilitan pipa tembaga pada tutup kipas angin tersebut.
 Usahakan agar pipa tembaga tidak sampai tertekuk atau patah.
 Kemudian kencangkan pipa tembaga tersebut dengan cable ties.
 - Sambungkan pipa tembaga dengan pipa plastik yang terhubung dengan pompa akuarium.
 Usahakan diameter pipa plastik dengan pipa tembaga sama, atau jika tidak gunakan klem pada sambungan tersebut supaya kuat.
 Sambungkan pipa plastik dengan pompa akuarium pada ujung lainnya biarkan terbuka untuk keluar masuk air.
 Isikan air dingin, atau jika perlu tambahkan es balok pada tandon air atau termos es.
 Nah, sekarang AC sederhana siap mendinginkan ruangan.


 Kira-kira cara kerjanya seperti ini: Air dingin yang dipompakan ke pipa tembaga menyebabkan pipa tersebut menurun suhunya. Sesuai prisip kondensasi. Suhu dingin di sekitar pipa dihembuskan oleh angin dari kipas. Secara teknis suhu angin keluar dari kipas lebih dingin dari pada suhu ruang. Maka, dingin deh ruangannya... Its simple! Cocok buat kamar yang tertutup (seperti AC sehingga dingin ruangan tetap terjaga dan optimal)..
GABUNG DI NEOBUX
INFORMASI NEOBUX